

Introduction: Beginning Light Painting (no Photoshop)


I recently bought a new camera and was investigating some of it's features when I came across light painting, or long exposure photography, on the internet. Most of us will have seen the basic form of lightpainting with a photo in a city with a road at night where the headlights of the car look like solid lines.
In this Instructable I will go through how to make a lightning fight and a basic orb.
Lightpainting is a method of opening the shutter of a camera for a relatively long time and lighting up the background or objects and adding other light with LEDs/torches/wands etc. As the sensor will continuously pick up light the photo will get lighter the longer the shutter is open so it needs to be done in the dark.
This is generally true of most makes of SLR and mirrorless cameras but my Olympus camera has an additional mode called Live composite where the camera takes consecutive images but only records areas with a change of light. This means that you can take your time as the background won't get lighter as time goes on and you can preview the shot in real time, so you can finish the shot when it looks good!
Supplies
For a basic lightpainting you will need
A camera with the ability to vary the shutter speed (most DSLR or mirrorless cameras)
A tripod
A torch / some lights
For the orb jig you will need
Wood and a lathe to turn a handle on
A bearing
Screw and washer
Some LED lights
Step 1: Light Painting Method


To start light painting you need a camera which has the ability to manually change the shutter speed, ISO and aperture, a sturdy tripod and a light of some kind. And it should be dark....the darker the better!
Settings - most DSLR cameras
You need to switch to manual or bulb mode
Set the ISO to a low setting - 100 is normally the lowest
Set the shutter speed to something long - say at least 30 seconds
Set the aperture to around F10.0
Settings - some Olympus cameras
Set the dial to AP (if available) or M
If AP is available choose Live composite
If AP is not available rotate the shutter button until the camera switches to live composite
Method
Oncethe camera is set up the focus has to be set. As it will be dark the camera won't be able to auto focus so what I have been doing is auto focus to a lit up object in the centre of the frame and then switch to manual focus (I have set this as a shortcut button) so that the focus point is fixed.
Press the shutter release button or the remote if available and start to paint - you will then have the time of the shutter speed or until you finish the shot depending on the type of camera.
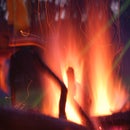
Step 2: Lightning Fight


This is a fairly simple process and fun to do. The above shots were done outside away from the main village so it was almost pitch black and ideal for this kind of shot.
All I used in addition to the standard equipment is a small LED light - I bought a set of these waterproof LED lights from eBay which work really well. These lights give you an option of 12 different single colours or a few options for the lights to go through all of the colours which is how the multicoloured version was done.
Method
First set up the camera and determine the edges of the photo. Have someone stand in the centre, light them up with a torch, auto focus on them and then switch to manual focus.
Get the people in the photo to make a suitable pose which they will need to hold for a while and start the shot.
Start by lighting up the first person (pointing the light away from the camera and toward the person) and then start the lightning painting trying to make the lightning meet in the middle (pointing the light toward the camera). Once you arrive at the other person finish up by lighting them up as before.
You generally need three people to do this but could be done with two with each other doing the others half of the lightpainting! Or after lighting up the person on say the left was finished they could run round the back of the camera while the lightning was being painted and also be the second person on the right....so they would be fighting themselves!!! As I have discovered with lightpainting once you get in to thinking about ideas more and more options open up.
Step 3: Orbs and Circles Jig


I had seen quite a few orbs on the internet so had a go at doing some myself. The main thing that you need is a/some light(s) that can be easily switched on an off by remote which can be attached to some string. You the need to swing the lights in a circle and rotate yourself about the rotation point of the lights.
When I first tried this I found that the string kept catching on my hand causing it to judder so I decided to make a jig.
I turned a handle and a grooved circle that a bearing would fit in to on my lathe. I then screwed the a bearing in to the end of the handle with a washer underneath so the bearing was free to rotate. I then epoxied the grooved circle on to the bearing. I could then tie my string around this groove and spin the handle so the string didn't catch on my hand.
Step 4: Orbs and Circles


I had practised making orbs in my front room so when I was on holiday I roped in my partner and brother in to going out at night time to a nearby weir.
I was hoping to get in to the water for some reflections but the stream bed was a little to uneven to make orbs in...especially in total darkness. Therefore we decided to make some orbs on top of the weir structure - this was also a little precarious as the walls were fairly narrow. We placed one of the LED lights on the ground which we rotated around so we knew we wouldn't fall off....this did have a down side of lighting up out legs below the orb. In retrospect I think the light from the orb would have been enough and would have ended up being more orby, but I think they still look cool.
To make the orbs I stood on top of the pier and my brother started the camera. I then started swinging the light and turned on the LED when it was in full flow, I then rotated around the LED on the ground unit I had made a full rotation and switched the LED's off. My partner then lit up some of the surrounding features until my brother was happy with what he could see on the camera display.
We also experimented with making circles at the bottom of one of the dry slipways so the light was reflected in the water with a bit of the trees in the foreground painted with a torch.
Step 5: Summary


I'm sure I will be doing more lightpainting and making a few more jigs, maybe doing a little more in winter when it's dark earlier and get the kids more involved as they really like doing this type of photography, maybe if it's cold I'll be able to light up someones breath too or try to make more dynamic photos somehow.
If this gives you some inspiration in to doing your own lightpaintings or you already do some it would be great to see your results too.
Cheers

Participated in the
Colors of the Rainbow Contest


